Hydroponics the Easy Way! Beginners Guide to the Kratky Method
So you want to learn a new way to garden huh? Well, I’m here to turn you into a farmer of the future in no time using hydroponics, but until then let’s start with the basics first.
What is Hydroponics?
Hydroponics is a way of growing plants in a growing medium that allows the roots to go down into a liquid reservoir where it will soak up the water and nutrients that you supply.
Common Misconceptions About Hydroponics
One of the biggest misconceptions about hydroponics is that you must grow them indoors with expensive lights and fans. You can do that, which I do enjoy doing for full control of the plants, but you can grow them outside using natural sunlight with no issues if it is the correct season and temperature. But being able to grow them inside lets you grow them year-round.
The main and most important difference between hydro gardening and traditional gardening is the medium it is growing in. In the next step we’ll be going over a checklist of items you’ll need for your very first grow.
Note: As an Amazon Associate I earn from qualifying purchases from links provided that direct towards Amazon. I was not paid, endorsed or been in contact with the company in any way for this product review
Material Checklist

Rockwool Cubes
Rockwool Cubes are the growing medium used where you will place your seeds and begin to grow. A 1.5″ inch cube is good for smaller plants like lettuce, herbs, etc. where a 4″ or larger would be better for larger fruiting plants like pepper or tomato plants. For simplicity we’ll be focusing on smaller plants for now.
What is rockwool you ask? It is a mix of chalk and stone that is melted and blown like cotton candy which allows it to build small fibers. It isn’t the most environmental friendly, but we can talk about alternatives at another time.

Net Cups
Net Cups are the backbone to a healthy plant, it gives the roots something to wrap around, hold onto and grow through providing strength to the stem. Once ready, the rockwool cubes will be placed in here, so you should get cups that are slightly larger than your rockwool.

Clay Pebbles
We will be using the clay pebbles to cover the top and sides of the rockwool once the plant starts sprouting to help prevent algae in the water below and any mold that may happen. It will also help in providing stability to the rockwool cube by packing it between the cube and net cup.

Nutrients
I’ve had a lot of success using Maxigro for leafy greens. I would suggest for your first grow to try some lettuce or other leafy greens as they tend to be the most forgiving and do well without a ton of light if you do decide to grow indoors.

Adjusters
A lot of times after mixing nutrients your pH will be too high or too low for the plant and could cause damage, so it helps to have a pH adjustment solution to change it. This is a dangerous chemical so you need to treat it with the utmost respect, and take all safety precautions while handling and storing it.

pH Tester
pH Test Strips are used for the water. A high or low ph can cause damage to the plant so it is essential to make sure there is a stable and beneficial pH.
These are paper test strips, but digital ones are also available.

Seeds
Seeds! As mentioned above we will be focusing on leafy greens, so buy a couple packs online or visit your local gardening center and support a local business.

Containers
I put these containers here mainly for example, I would check your local dollar store or home improvement store. You can realistically use any container that can hold water and the lid could be cut to fit a net pot in. You can even use large bins and put multiple plants in one so you only have to worry about one reservoir. If you use plastic, make sure it is Food Safe BPA free as not to contaminate your plants.
Note: If you are using a clear plastic, you will have to spray paint them black, or cover them in a paper to not let any light in the tank that would cause algae. We talk more about this later.
Optional Materials

If you want to give indoors a shot, I’ve had no issue growing with this small LED light for leafy greens and herbs. This will generally be used for a small amount of plants (3-4) with it about 12-16″ above the canopy.
Note: If you plan on doing fruiting plants, you must use a higher wattage LED, especially as it goes into adulthood and fruiting. Read reviews on the ACTUAL output instead of the advertised. Many LED sellers will put the “comparable” wattage in title and description, be sure to look for the specs and other customer reviews.

If you plan on growing indoors and are using LED’s, please get some safety glasses. There has been more and more information coming out about the effects of blue light and loss of vision, so please wear your protective glasses whenever near your grow lights.
What is the Kratky Method?
Now that we got that out of the way, you probably seen me use “Kratky Method” a couple times now and probably asked yourself “What is that?” The Kratky Method of growing plants hydroponically was a system designed by Bernard Kratky at the University of Hawaii. He described a system that floats above a water reservoir that leaves an air gaps between the plant and water that allows the plant to take in oxygen. With that percolating in the back of our mind, lets finally start setting up our plants.
Getting Started
1. Germinating the Seeds
Prepping your Rockwool
You will first want to start germinating your seeds. I like to first wet my rockwool with some clean water. I like using water from my fish tank because it already has some nutrients in it but any clean water will do.
Keep in mind that the water from the tap generally has chlorine and other chemicals in it that could be harmful to plants. I suggest picking up a small aquarium air pump, air stone and tubing and let that sit in 1-2 gallons of water for 12-24 hrs, letting the bubbles carry some of those chemicals out. This pump can also be used for later for DWC (Deep Water Culture Hydroponics).
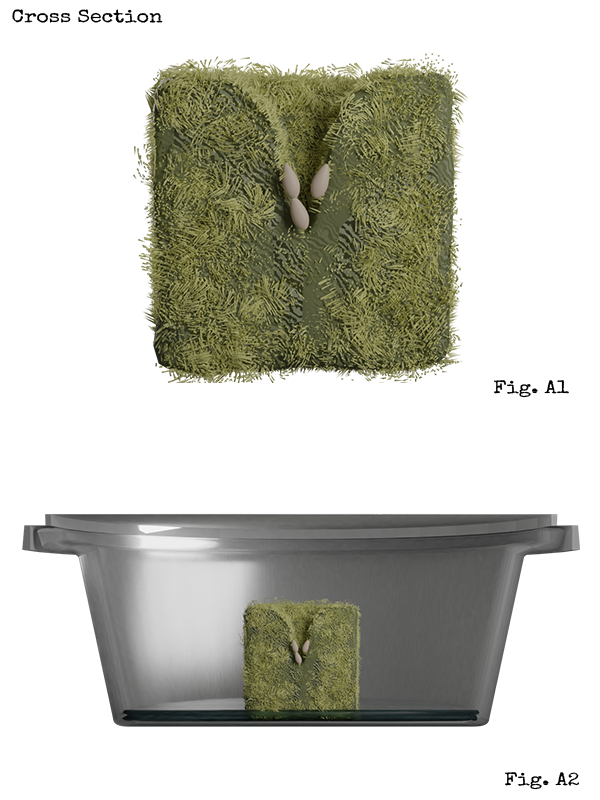
Placing the seeds (Fig. A1)
You will notice a small hole at the top of your rockwool cube. Open your seed packet, and use a wet toothpick or chopstick to pick up 3-4 seeds and nestle them down into the hole.
Getting Ready for Germination(Fig. A2)
Grab a clear tupperware or container, placing a small amount of water on the bottom to keep the rockwool hydrated and place it outside or under your lights.
Seedlings and seeds love high humidity, so make sure to cover your container with the lid. Let sit until it starts sprouting.
Indoor Lighting
If you are using lights, I generally keep the same time schedule of 18 hours on / 6 hours off (e.g. 6.a.m – 10 p.m) from seedling all the way till harvest. Different plants will require different things so you do some research on what you plant prefers. You can purchase timers here if you don’t want to do it manually.
2. Prepping Your Container
While the seeds are starting to germinate you will have a 5-10 days to prepare your container for them.
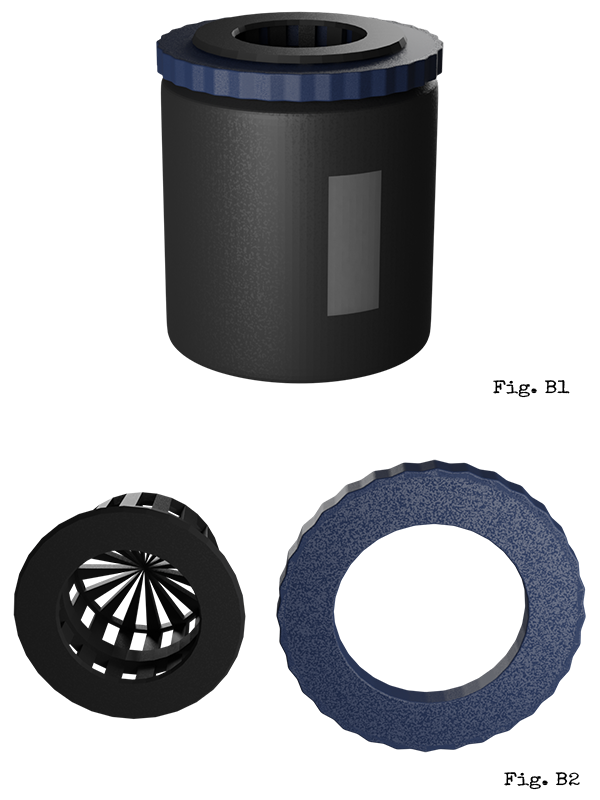
Painting the Container(Fig. B2)
Lets first start by painting it or covering it. If you are using a clear container, I like to put a piece of masking tape on the side of the container, then spray paint it black. I peel the tape off after to reveal a clear strip so I can easily check the water level without having to open it up.
If you choose to cover it, you can use a fabric, paper or even aluminum foil. The goal is to not let any light inside the reservoir.
On the figure I am showing an example of a single container per plant, but the same would apply if your using a larger container for multiple plants.
Cutting the Hole for the Netcup (Fig. B2)
To fit the net cup into the container we’re going to need to cut a whole in the container lid. Measure the size of your net cup underneath the lip of it and cut a slightly larger hole in your container lid using scissors, tin snips, etc. Remember to always cut away from you and wear safety googles in case of shards.
After I will place an empty netcup inside the lid, place it on my container and look through the clear strip and make a mark about 3/4″ below where the net cup sits. That will now be my water fill line.
3. Starting to Sprout!

It’s ALIVE! (Fig. C1)
Now that your seedlings have started to sprout you going to want to wait until they about an inch or inch 1/2 worth of root hanging out the bottom of the rockwool before putting it in your net cup. You may notice two or three other seedlings coming from the same spot, leave those for now, We’ll leave the strongest one and pick all the rest out later.
Ready for the Netcup
Once your seedlings have about an inch or more root length it’s time to move it into the net cup and into the container.
Gently lower the rockwool into the netcup letting the roots hang in between the holes in the net cup. place the netcup in your container lid and fill to the line with clean water. We will let it sit with just regular clean water for awhile until it gets a bit bigger and ready for nutrients
At this point you will want to carefully put clay pebbles between the rockwool and netcup for stability, be careful not to crush the seedling. If you can safely fit the clay pebble on top of the rockwool without crushing or blocking light from the seedling you may do so, but you can always do that later, but make sure to look for mold if left exposed for too long. Try to cover the top of the rockwool with pebbles as soon as possible.
4. Mixing Nutrients
When to Add Nutrients
Personally, I like adding them when they are just about out of the seedling stage. They will have a few leafs, a couple inches in growth and generally you will see the growth starting to slow down because they lack the nutrients to continue. This is when I would start adding them.
Prepping to Mix Nutrients
When I start out I like to get my clean water pH to about a 6 before I start mixing nutrients. You can do this with the pH Down or pH Up depending on your water system. Usually my pH is higher, so I find about 6-7 drops of pH Down from a pipette will lower it 1 number. so to lower from an 8 to 6 would be 12 drops from a pipette. This may be different for you depending on brand, and your local water supply so test it until your comfortable.
IMPORTANT: Remember, pH adjusters can be dangerous, it is important to use it cautiously at all times and to wear safety gear while handling it including gloves and eye protection.
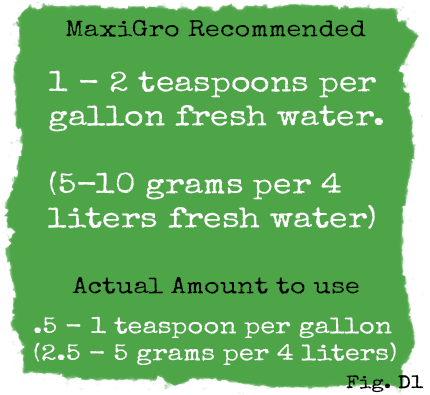
Adding Nutrients(Fig. D1)
Once my plain water pH is around 6, I will check the bag of my nutrients for the recommended dosage for the plants current life stage. I then cut the recommended amount in half and use that much. Remember, it’s a lot harder to fix a nutrient burned plant than it is to add a little more nutrients, always favor the lower side.
Adjusting pH for Final Nutrient Mix
After you have added your nutrients, check your pH again and adjust it accordingly. I like mine at about a 5.5, but do some research on the plant your growing and see what they like, that is the most important.
When to Refill Nutrients
I will generally mix about 1-4 gallons of nutrients a week depending on how much my plants are using. If the water gets low during the week I will top it off to the fill line with regular clean water and on the weekend I will dump all the water and refill it with clean nutrient rich water.
4. Wrapping it all up

Watching it Grow
You are now on your way to growing your first plant hydroponically, and one step closer to conquering the gardening world. Now you just have to wait.
Keep an eye out for any odd colorations on leaves, insect damage to leafs. Do a lot of research on the plants your growing and look at the things like humidity, temperature and other specifics that they thrive in and see if there is any adjustments you could make to give them the most comfortable lives possible. Remember these are living creatures, and they will always do their best when provided with the best.